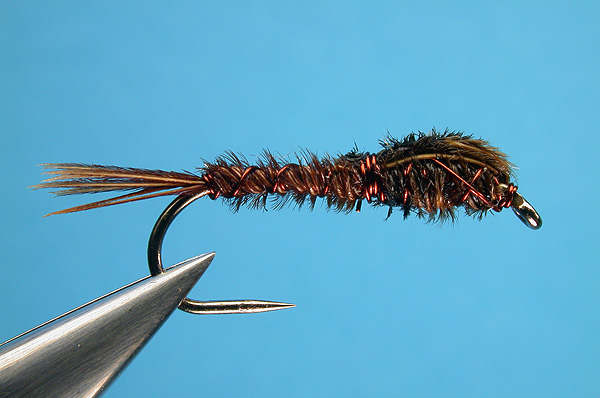
Sawyer Pheasant Tail nymph
(The materials are listed in the order they are tied in. Instructions assume righthanded tier.)
This nymph, created by Frank Sawyer, ranks, with the Gold Ribbed Hare's Ear nymph, as one of the most popular flies of its type in the world. It has stood the test of time and has proven itself on rivers and streams all over the world.
Frank Sawyer, who worked as the riverkeeper on the Wiltshire Avon in England, designed this nymph to imitate several species of the Baetis family, generally referred to as the 'olives'.
Being an utterly practical man, his aim was to focus on what he considered to be the key elements, and forgo unnecessary 'niceties' in the dressing. These key elements are:
- these nymphs are 'swimmers', hence a slim streamlined silhouette
- when swimming, the natural folds its legs flat against the body, as such no legs on the imitation
- gill movement along the abdomen
- very short, 'fuzzy' tails
And a final requirement was the need for a nymph which would have a clean entry through the surface film, sinking quickly to the depth required by the angler.
The nymph Frank Sawyer came up with is extremely elegant in its simplicity in materials and composition, using only a hook, dark copper wire and a few pheasant tail fibers.
Funnily enough, though the nymph as tied by Frank Sawyer is such a simple pattern, for some strange reason it does not travel across the 'Big Pond' very easily ;-)
Not to mince words: It gets 'bastardized'. The Pheasant Tail nymphs found in the various American catalogs show all sorts of interesting variations. For example the nymphs depicted will have a bright copper thorax. Or a dubbed thorax. And _all_ will have tails which are way too long, when compared to the natural Baetis nymph.
Note: A good supply of _enamelled_ copper wire may be found taking apart old powersupplies, dynamos, etc. For this swap I have tied the nymphs on #18 hooks, using copper wire with a diameter of 0.06mm (0.0025") This wire will tie down to #28, should you be into 'wee' nymphs. The largest diameter I would use (for #12 hooks) would be 0.15mm (0.006")
Tying instructions:
- (I will describe how I tie this nymph, explaining also where I deviate from Sawyer's method and why. The final result of either method is very close. Use whichever you prefer.)
- Take a piece of copper wire, about 12 inches in length. Attach near the eye like you would do with thread. Build up a slight thorax covering one-third of the hook shank, then wrap the wire to the start of the bend.
- Even the tips of four fibers of the tail feather, clip close to stem. At the back of the hook shank tie in the pheasant fibers near the tips, forming a short tail, with two or three turns of wire.
- Keeping the wire tight, wrap the fiber butts toward the eye in a counter wrap, i.e. if you normally wrap materials over the shank and away from you (as most of us do) then you wrap the fibers over the shank _towards_ you. Trap each successive turn with the tip of your left index finger to stop the fibers unwinding. Your final wrap should leave the butts sticking straight up, right behind the eye. Please note that the wire is not wound with the fibers, but left behind until step 4.
- In open turns spiral the copper wire towards the eye. These turns will 'cross' the wrapped pheasant fibers, re-inforcing the body and preventing the whole nymph coming undone when chewed upon by the fish.
- After you have tied down the butts behind the eye, fold them back and make few wraps of wire between the eye and the pheasant fibers. Next take the wire in one open turn over the shank to just behind the thorax. Fold the butts back over the thorax and tie down with one or two wraps of wire, followed by a three turn whip-finish (preferred) or a couple of half hitches. Clip butts, apply a very small amount of (thin) head cement and the P.T. nymph is complete.
My hesitations about this approach are that:
The rope method results in fatter, somewhat uneven, abdomen. Especially in smaller sizes I like to get a very slender silhouette.
Folding the wingcase forward again leaves a weak spot at the thorax/abdomen point. In my experience the fibers will break at this point after one or two fish and the nymph will lose definition. (And I like my flies to last.)